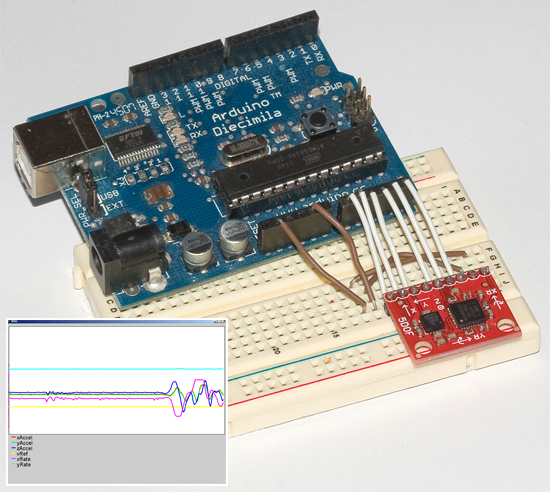
Os dejo por aqui una interesante implementación de un acelerómetro y un giroscopio utilizados como sistema de medición inercial con Arduino. El sistema es muy sencillo y no necesita de ningún componente extra más que un acelerómetro ADXL y un giroscopio IDG300. Para visualizar los datos, se utiliza un pequeño programa realizado en Processing, el cual muestra las curvas de los 3 ejes del acelerómetro y los valores de cada eje del giroscopio unas 100 veces por segundo.
Os dejo a continuación una pequeña explicación del montaje, el código fuente y un video que muestra el conjunto funcionando.
Sistema de medición inercial
Wikipedia:
En mecánica, un sistema de referencia inercial es un sistema de referencia en el que las leyes del movimiento cumplen la conservación del momento lineal. El término aparece principalmente en mecánica newtoniana donde los sistemas inerciales son precisamente aquellos en los que se cumplen las leyes de Newton.
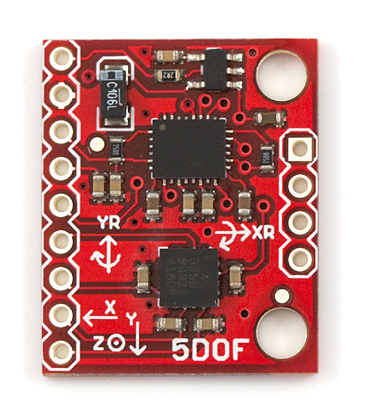
El sistema es realmente muy sencillo y salvo una placa Arduino y un conjunto de acelerómetro y giroscopio, no se necesita nada más. aunque se podrían haber usado los componentes por separado, el autor ha preferido utilizar un módulo IMU fabricado por Sparkfun dado que incorpora los dos componentes en una sola placa, la cual podemos ver en la imagen.
Aunque existen sistemas más complejos (y completos), éste es una buena forma de realizar las primeras pruebas de forma rápida y sencilla dado que ofrece una sensibilidad no despreciable y además podemos visualizar los datos directamente desde nuestro ordenador.
El código fuente
Tanto el acelerómetro como el girocópio devuelve valores analógicos para cada uno de sus ejes. Ésto hace que conectarlo con nuestra placa Arduino sea muy fácil ya que disponemos de varias entradas ADC para medir valores analógicos. Tras iniciar una comunicación série a 115kbps, se leen los valores y se envian por el puerto série 100 veces por segundo. El código fuente para Arduino sería éste:
// Maurice Ribble
// 6-28-2009
// https://www.glacialwanderer.com/hobbyrobotics

// This app just probes two external sensors (ADXL330 and IDG300) and
// then sends that data over a serial connection.  I used a sparkfun
// breakout board to make using these chips easier.
// https://www.sparkfun.com/commerce/product_info.php?products_id=741

// I wrote a processing.org app that reads in this data and graphs it
// on a pc.

#define X_ACCEL_APIN 0
#define Y_ACCEL_APIN 1
#define Z_ACCEL_APIN 2
#define V_REF_APIN   3
#define Y_RATE_APIN  4
#define X_RATE_APIN  5

void setup()
{
  Serial.begin(115200);
}

// If this is defined it prints out the FPS that we can send a
// complete set of data over the serial port.
//#define CHECK_FPS

void loop()
{
  int xAccel=0, yAccel=0, zAccel=0, vRef=0, xRate=0, yRate=0;
  unsigned int startTag = 0xDEAD;  // Analog port maxes at 1023 so this is a safe termination value
  int loopCount;

#ifdef CHECK_FPS
  unsigned long startTime, endTime;
  startTime = millis();
#endif

  // Can't do more than 64 loops or could overflow the 16 bit ints
  // This just averages together as many sensor reads as we can in
  // order to reduce sensor noise.  Might want to introduce add
  // a smarter filter her in the future.
  loopCount = 12;  // 12 gives a little over 100 FPS
  for(int i = 0; i< loopCount; ++i)
  {
    // It takes 100 us (0.0001 s) to read an analog input
    xAccel += analogRead(X_ACCEL_APIN);
    yAccel += analogRead(Y_ACCEL_APIN);
    zAccel += analogRead(Z_ACCEL_APIN);
    vRef   += analogRead(V_REF_APIN);
    xRate  += analogRead(X_RATE_APIN);
    yRate  += analogRead(Y_RATE_APIN);
  }
  xAccel /= loopCount;
  yAccel /= loopCount;
  zAccel /= loopCount;
  vRef   /= loopCount;
  xRate  /= loopCount;
  yRate  /= loopCount;

  Serial.write( (unsigned byte*)&startTag, 2);
  Serial.write((unsigned byte*)&xAccel, 2);
  Serial.write((unsigned byte*)&yAccel, 2);
  Serial.write((unsigned byte*)&zAccel, 2);
  Serial.write((unsigned byte*)&vRef, 2);
  Serial.write((unsigned byte*)&xRate, 2);
  Serial.write((unsigned byte*)&yRate, 2);

#ifdef CHECK_FPS
  endTime = millis();
  Serial.print(" - FPS: ");
  Serial.println(1.f / (endTime-startTime) * 1000);
#endif
}
Visualizando los datos con Processing
Una vez que tenemos todos los datos listo para ser evaluados, tenemos una pequeña ventana creada utilizando Processing para visualizar los datos en tiempo real.
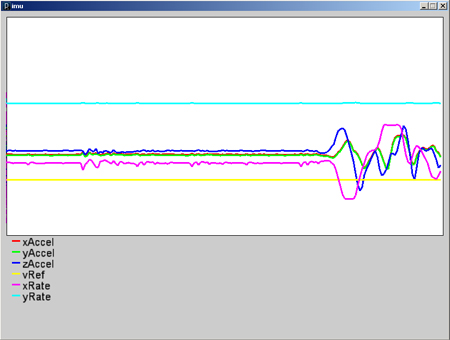
Es una aplicación muy sencilla que recoge los datos enviados por arduino con diferentes colores y los muestra haciendo un scroll lateral. El código de processing es el siguiente:
// Maurice Ribble
// 6-28-2009
// https://www.glacialwanderer.com/hobbyrobotics

// This takes data off the serial port and graphs it.
// There is an option to log this data to a file.

// I wrote an arduino app that sends data in the format expected by this app.
// The arduino app sends accelerometer and gyroscope data.

import processing.serial.*;

// Globals
int g_winW             = 820;   // Window Width
int g_winH             = 600;   // Window Height
boolean g_dumpToFile   = true;  // Dumps data to c:\output.txt in a comma seperated format (easy to import into Excel)
boolean g_enableFilter = true;  // Enables simple filter to help smooth out data.

cDataArray g_xAccel    = new cDataArray(200);
cDataArray g_yAccel    = new cDataArray(200);
cDataArray g_zAccel    = new cDataArray(200);
cDataArray g_vRef      = new cDataArray(200);
cDataArray g_xRate     = new cDataArray(200);
cDataArray g_yRate     = new cDataArray(200);
cGraph g_graph         = new cGraph(10, 190, 800, 400);
Serial g_serial;
PFont  g_font;

void setup()
{
  size(g_winW, g_winH, P2D);

  println(Serial.list());
  g_serial = new Serial(this, Serial.list()[1], 115200, 'N', 8, 1.0);
  g_font = loadFont("ArialMT-20.vlw");
  textFont(g_font, 20);

  // This draws the graph key info
  strokeWeight(1.5);
  stroke(255, 0, 0);     line(20, 420, 35, 420);
  stroke(0, 255, 0);     line(20, 440, 35, 440);
  stroke(0, 0, 255);     line(20, 460, 35, 460);
  stroke(255, 255, 0);   line(20, 480, 35, 480);
  stroke(255, 0, 255);   line(20, 500, 35, 500);
  stroke(0, 255, 255);   line(20, 520, 35, 520);
  fill(0, 0, 0);
  text("xAccel", 40, 430);
  text("yAccel", 40, 450);
  text("zAccel", 40, 470);
  text("vRef", 40, 490);
  text("xRate", 40, 510);
  text("yRate", 40, 530);

  if (g_dumpToFile)
  {
    // This clears deletes the old file each time the app restarts
    byte[] tmpChars = {'r', 'n'};
    saveBytes("c:\output.txt", tmpChars);
  }
}

void draw()
{
  // We need to read in all the avilable data so graphing doesn't lag behind
  while (g_serial.available() >= 2*6+2)
  {
    processSerialData();
  }

  strokeWeight(1);
  fill(255, 255, 255);
  g_graph.drawGraphBox();

  strokeWeight(1.5);
  stroke(255, 0, 0);
  g_graph.drawLine(g_xAccel, 0, 1024);
  stroke(0, 255, 0);
  g_graph.drawLine(g_yAccel, 0, 1024);
  stroke(0, 0, 255);
  g_graph.drawLine(g_zAccel, 0, 1024);
  stroke(255, 255, 0);
  g_graph.drawLine(g_vRef, 0, 1024);
  stroke(255, 0, 255);
  g_graph.drawLine(g_xRate, 0, 1024);
  stroke(0, 255, 255);
  g_graph.drawLine(g_yRate, 0, 1024);
}

// This reads in one set of the data from the serial port
void processSerialData()
{
  int inByte = 0;
  int curMatchPos = 0;
  int[] intBuf = new int[2];

  intBuf[0] = 0xAD;
  intBuf[1] = 0xDE;

  while (g_serial.available() < 2); // Loop until we have enough bytes
  inByte = g_serial.read();

  // This while look looks for two bytes sent by the client 0xDEAD
  // This allows us to resync the server and client if they ever
  // loose sync.  In my testing I haven't seen them loose sync so
  // this could be removed if you need to, but it is a good way to
  // prevent catastrophic failure.
  while(curMatchPos < 2)
  {
    if (inByte == intBuf[curMatchPos])
    {
      ++curMatchPos;

      if (curMatchPos == 2)
        break;

      while (g_serial.available() < 2); // Loop until we have enough bytes
      inByte = g_serial.read();
    }
    else
    {
      if (curMatchPos == 0)
      {
        while (g_serial.available() < 2); // Loop until we have enough bytes
        inByte = g_serial.read();
      }
      else
      {
        curMatchPos = 0;
      }
    }
  }

  while (g_serial.available() < 2*6);  // Loop until we have a full set of data

  // This reads in one set of data
  {
    byte[] inBuf = new byte[2];
    int xAccel, yAccel, zAccel, vRef, xRate, yRate;

    g_serial.readBytes(inBuf);
    // Had to do some type conversion since Java doesn't support unsigned bytes
    xAccel = ((int)(inBuf[1]&0xFF) << 8) + ((int)(inBuf[0]&0xFF) << 0);
    g_serial.readBytes(inBuf);
    yAccel = ((int)(inBuf[1]&0xFF) << 8) + ((int)(inBuf[0]&0xFF) << 0);
    g_serial.readBytes(inBuf);
    zAccel = ((int)(inBuf[1]&0xFF) << 8) + ((int)(inBuf[0]&0xFF) << 0);
    g_serial.readBytes(inBuf);
    vRef   = ((int)(inBuf[1]&0xFF) << 8) + ((int)(inBuf[0]&0xFF) << 0);
    g_serial.readBytes(inBuf);
    xRate  = ((int)(inBuf[1]&0xFF) << 8) + ((int)(inBuf[0]&0xFF) << 0);
    g_serial.readBytes(inBuf);
    yRate  = ((int)(inBuf[1]&0xFF) << 8) + ((int)(inBuf[0]&0xFF) << 0);

    g_xAccel.addVal(xAccel);
    g_yAccel.addVal(yAccel);
    g_zAccel.addVal(zAccel);
    g_vRef.addVal(vRef);
    g_xRate.addVal(xRate);
    g_yRate.addVal(yRate);

    if (g_dumpToFile)  // Dump data to a file if needed
    {
      String tempStr;
      tempStr = xAccel + "," + yAccel + "," + zAccel + "," + vRef + "," + xRate + "," + yRate + "rn";
      FileWriter file;

      try
      {
        file = new FileWriter("c:\output.txt", true); //bool tells to append
        file.write(tempStr, 0, tempStr.length()); //(string, start char, end char)
        file.close();
      }
      catch(Exception e)
      {
        println("Error: Can't open file!");
      }
    }

    /*
    print(xAccel);  print(" ");   print(yAccel);   print(" ");    print(zAccel);     print(" ");
    print(vRef);    print(" ");   print(xRate);    print(" ");    println(yRate);
    */
  }
}

// This class helps mangage the arrays of data I need to keep around for graphing.
class cDataArray
{
  float[] m_data;
  int m_maxSize;
  int m_startIndex = 0;
  int m_endIndex = 0;
  int m_curSize;

  cDataArray(int maxSize)
  {
    m_maxSize = maxSize;
    m_data = new float[maxSize];
  }

  void addVal(float val)
  {

    if (g_enableFilter && (m_curSize != 0))
    {
      int indx;

      if (m_endIndex == 0)
        indx = m_maxSize-1;
      else
        indx = m_endIndex - 1;

      m_data[m_endIndex] = getVal(indx)*.5 + val*.5;
    }
    else
    {
      m_data[m_endIndex] = val;
    }

    m_endIndex = (m_endIndex+1)%m_maxSize;
    if (m_curSize == m_maxSize)
    {
      m_startIndex = (m_startIndex+1)%m_maxSize;
    }
    else
    {
      m_curSize++;
    }
  }

  float getVal(int index)
  {
    return m_data[(m_startIndex+index)%m_maxSize];
  }

  int getCurSize()
  {
    return m_curSize;
  }

  int getMaxSize()
  {
    return m_maxSize;
  }
}

// This class takes the data and helps graph it
class cGraph
{
  float m_gWidth, m_gHeight;
  float m_gLeft, m_gBottom, m_gRight, m_gTop;

  cGraph(float x, float y, float w, float h)
  {
    m_gWidth     = w;
    m_gHeight    = h;
    m_gLeft      = x;
    m_gBottom    = g_winH - y;
    m_gRight     = x + w;
    m_gTop       = g_winH - y - h;
  }

  void drawGraphBox()
  {
    stroke(0, 0, 0);
    rectMode(CORNERS);
    rect(m_gLeft, m_gBottom, m_gRight, m_gTop);
  }

  void drawLine(cDataArray data, float minRange, float maxRange)
  {
    float graphMultX = m_gWidth/data.getMaxSize();
    float graphMultY = m_gHeight/(maxRange-minRange);

    for(int i=0; i
El código fuente también se puede descargar en formato zip aqui. Y como no podía ser de otra forma, aqui teneis un video del montage funcionando:
Artículo original escrito por Maurice Ribble. Enlace aqui.
 Detector de proximidad de dispositivos Bluetooth con ESP32 en Arduino
 Máquina cortadora de hilo automática con Arduino
 Cómo conectar Android con Arduino por Bluetooth
 Joystick casero para Flight Simulator impreso en 3D y controlado con Arduino
 (Video) Secuenciador MIDI con Arduino
 Glosario del BricoCopter
